Permission Set Group은 여러 Permission Set을 합친 거잖아? 그런데 문제는:
어떤 Permission Set에는 필요 없는 권한이 들어 있음
그룹에서 그 권한만 빼고 싶음
이럴 때 쓰는 게 Muted Permissions.
즉, 그 권한을 삭제하는 게 아니라 그룹 안에서만 비활성화
permission set group 생성:
Setup > Permission Set Groups > New Permission Set Group
Label: test permission set group
Save!
Permission Sets in Group > Add Permission Set
✅ HyperionCASCPermSet
Add!
Done!
Mute Permission생성:
Setup > Permission Set Groups > Muting Permission Set in Group > New
Label: test permission set group Muted
Save!
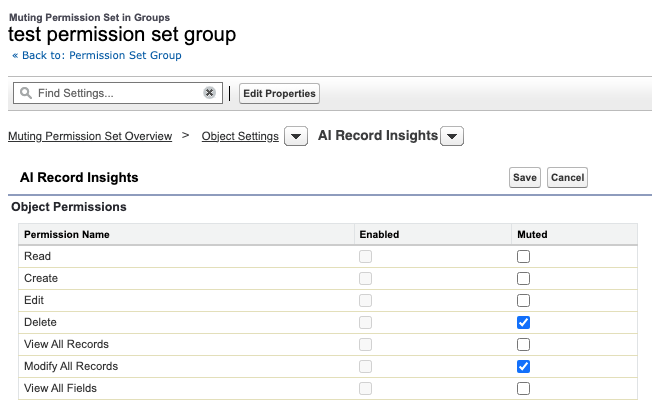
불필요한 권한만 Mute(끄기):
Setup > Permission Set Groups > test_permission_set_group > Muting Permission Set in Group > test permission set group Muted
> Object Settings > AI Record Insights > Edit
Delete ✅ Muted
Modify All Records ✅ Muted
Save!
Permission set group에 사용자 배정하기:
Setup > Permission Set Groups > test_permission_set_group > Manage Assignments > Add Assignment
✅ Ellie Howard
✅ Eleanor Lim
Next!
✅ No expiration date
Assign!
Organization-Wide Sharing Defaults
OWD를 설정시 고려할점:
해당 Object에 가장 권한이 없는 사용자는 누구인가?
이 사용자가 해당 Object의 레코드중에 보면 안되는게 있나?
Yes – Sharing Model: Private
No – 이 사용자가 Object의 레코드중에 편집하면 안되는게 있나?
Yes – Sharing Model: Public Read-Only
No – Sharing Model: Public Read/Write
Field
Description
Private
Only the record owner, and users above that role in the hierarchy, can view, edit, and report on those records.
Public Read Only
All users can view and report on records but not edit them. Only the owner, and users above that role in the hierarchy, can edit those records.
Public Read/Write
All users can view, edit, and report on all records.
Controlled by Parent
A user can perform an action (such as view, edit, or delete) on a record based on whether he or she can perform that same action on the record associated with it.
organization-wide sharing setting에서 어떤 Object를 Private이나 Read-Only로 주었다면 다음의 방법으로 추가 권한을 부여할 수 있습니다.
role hierarchy
defining sharing rules
using other sharing features
위의 방법들은 권한을 추가적으로 부여할뿐, 갖고 있던 권한을 제한할 수는 없습니다.
Set Organization-Wide Sharing Defaults
Setup > Sharing Settings > Edit
Default Internal Access select the default access you want to use
Grant Access Using Hierarchies allow employees at higher levels in the role hierarchy to access records automatically
As part of your data access configuration, you must give your sales reps access to accounts. You plan to reuse the same permission set for users who’ll need greater access to accounts, so you’ll mute certain permissions for your sales reps using a permission set group.
You also need to configure your organization-wide defaults for accounts and opportunities so users only see the records they need to.
Create a permission set:
Label: Account Access
API Name: Account_Access
Add a description (We won’t check for this.)
License: -None-
Enable Account Object Permissions: Read, Create, Edit, Delete, View All Records, and Modify All Records
Enable Account Field Permissions: Read Access and Edit Access for all fields
Create a permission set group and assign it to the user you created:
Label: Sales User
API Name: Sales_User
Include the Account Access permission set that you created
Create a muting permission set in the permission set group and name it Sales User Muted (API Name: Sales_User_Muted)
Mute Account Object Permissions: Delete, View All Records, and Modify All Records
Mute Account Field Permissions: Edit Access for the Annual Revenue and Customer Priority fields
Assign the permission set group to the user you created in the previous unit
Configure organization-wide defaults:
Account and Contract: Visible but not editable for all users.
Opportunity: Visible only to record owners and users higher in the role hierarchy.
Note: Wait for the updates to finish processing before checking this challenge.
풀이
Permission Set
Setup > Permission Sets > New
Label: Account Access
API Name: Account_Access
License: -None-
Save!
Object Settings > Accounts > Edit
Object Permissions
Read ✅
Create ✅
Edit ✅
Delete ✅
View All Records ✅
Modify All Records ✅
Field Permissions
✅ Read Access
✅ Edit Access
Save!
Permission Set Group
Setup > Permission Set Groups > New Permission Set Group
Label: Sales User
API Name: Sales_User
Save!
Permission Sets in Group > Add Permission Set 버튼
Check ✅ Account Access
Add!
Done!
Back to: Permission Set Group > Muting Permission Set in Group > New
Label: Sales User Muted
API Name: Sales_User_Muted
Save!
[Sales User Muted] > Object Settings > [Accounts] > Edit
Object Permissions
Delete ✅ Muted
View All Records ✅ Muted
Modify All Records ✅ Muted
Field Permissions:
Annual Revenue ✅ Edit Access Muted
Customer Priority ✅ Edit Access Muted
Save!
Back to: Permission Set Group > Manage Assignments > Add Assignment
✅ Ellie Howard
Next!
✅ No expiration date
Assign!
OWD
Setup > Sharing Settings > Edit
Account and Contract
Default Internal Access: Public Read Only
Default External Access: Public Read Only
Opportunity
Default Internal Access: Private
Default External Access: Private
✅ Grant Access Using Hierarchies
Save!
All sharing rules will be recalculated based on the new defaults, which may require significant time. The original values will be displayed until the operation completes. An email notification will be sent upon completion. Do you want to continue?
Minimum Access > permission sets and permission set groups
Permission Set
Profile
User, object, and field permissions
Default record types
Custom permissions
Default assigned apps
Connected app access
Page layout assignments
Apex class access
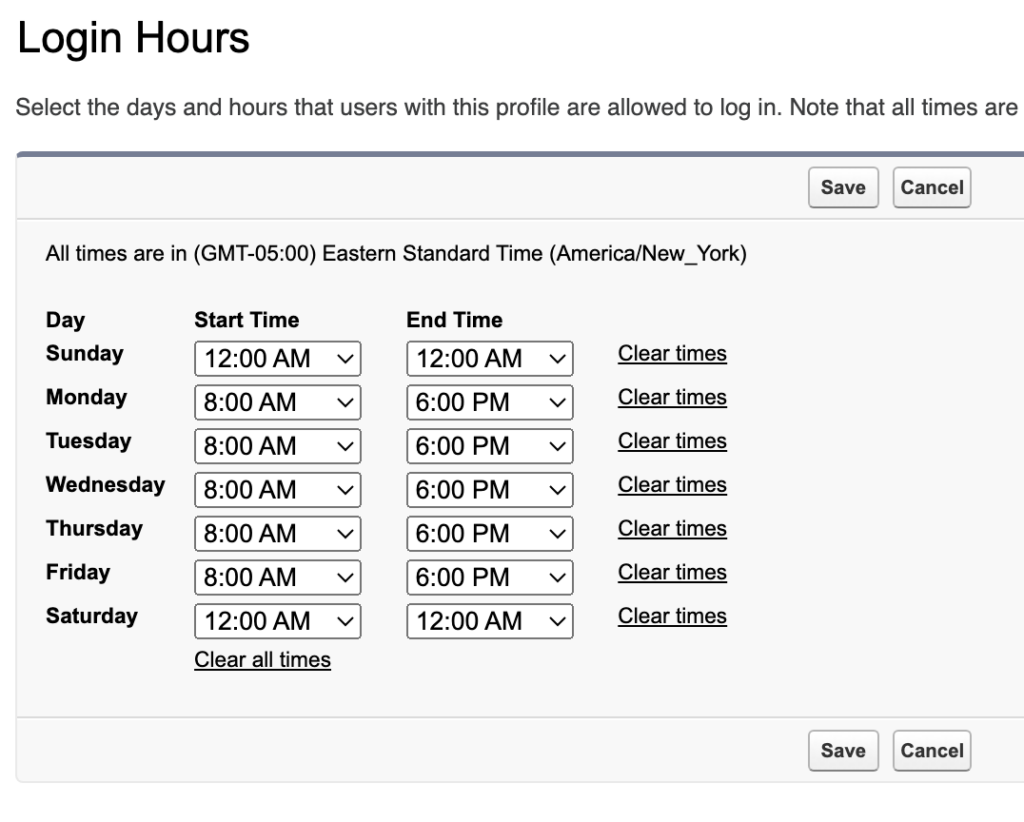
Login hours
Visualforce page access
Login IP ranges
Tab settings
Roles
what users can see
where they’re located in the role hierarchy
Users at the top of the hierarchy can see all
Roles are only available in Professional, Enterprise, Unlimited, Performance, and Developer editions
Roles are optional
each user can have only one
Alias
short name of the user
list pages, reports or dashboard where the full name doesn’t fit
first letter of first name, 4 letters of last name
Guidelines for Adding Users
Username: unique
Username format: email address, but it doesn’t have to be real
Email: 중복가능
Passwords: 첫로그인 전 무조건 password reset필수
Login link: email로 받은 login link는 최초1회만 로그인가능
Add Users
사용자 생성시 Add Multiple Users옵션으로 한번에 10명까지 사용자를 추가할 수 있다.
Generate password and notify user immediately를 선택하여 password reset을 하도록 한다.
Freeze a User
Setup > Users > [User] > Freeze버튼
로그인만 막음
License는 그대로 사용 중
계정 문제 조사할 때 사용
Deactivate a User
Setup > Users > [User] > Edit
Uncheck 🔲 Active
Save!
비활성화:
로그인 막음
License 반환됨
사용자가 회사 떠났을 때
See What a User Can Access
사용자의 Permission을 한번에 모아보고 싶을때:
Setup > Users > [User] > View Summary
여기서 나열된 Permission이 어떻게 할당되었는지 보고 싶다면, 해당레코드 맨 끝의 more > Access Granted By
Hands-on Challenge
+500 points
Your Challenge
Create a User and Assign a Profile
Add a new user and assign the user a profile following our best practices.
Prework:
Create a new Trailhead Playground for this module. Using an existing org might create problems when you check the challenge. Click the dropdown arrow next to the Launch button, and choose Create a Trailhead Playground.
Visit Setup | Company Settings | Company Information | User Licenses to verify that you have one remaining Salesforce license available.
If you already used both of your Salesforce licenses, deactivate one to complete this challenge.
Create a new user:
Open Setup in the org
In the Quick Find box, enter usersCopy and then select Users
Click New User
Enter the firstCopynameCopy and lastCopynameCopy
For Alias, enter testuserCopy
For Email, enter your email address
For Username, enter <YourInitials>_testuser_<YYYYMMDD>@example.comCopy. (Usernames must be unique across all Salesforce orgs.)
For License, select Salesforce
For Profile, select Minimum Access – Salesforce
For Role, select Western Sales Team
Click Save
풀이
새로운 Playground생성, “User Management”
과제에 필요한 라이센스가 남아있는지 확인:
Setup > Company Information > User Licenses 현재 조직에 남아있는 라이센스가 몇개인지 보여줌
Name: Salesforce
Status: Active
Total Licenses: 2
Used Licenses: 1
Remaining Licenses: 1 만약 Salesforce라이센스가 하나도 남아있지 않다면 User에 들어가서 해당 유저를 Deactivate시키세요.
Set up single sign-on(SSO) from a third-party identity provider.
Become familiar with the tools to troubleshoot SAML requests.
Single Sign-On
SSO를 통하면 로그인을 하지 않고도 로그인을 할수 있고 아래의 이점들이 있습니다:
비번관리를 하지 않아도 되고
수동으로 로그인 하지 않아도 되고, 5-20초안에 로그인이 된다.
원클릭으로 문서를 열수 있는 링크를 제공합니다.
민감한 정보들은 한곳에서 관리할 수 있습니다.
만약 회사앱들이 물리적으로 같은 서버에 존재한다면 inbound SSO으로 다른 앱에서 로그인을 하면 Salesforce에도 로그인 없이 로그인을 자동으로 할수 있고, 마찬가지로 Salesforce에 로그인이 되어 있다면 outbound SSO를 통해 다른 회사앱에도 자동으로 로그인이 되게 할수 있습니다.
Keep MFA in Mind
SSO 제공업체에서 MFA 서비스를 제공하는 경우 사용자가 Salesforce에 액세스할 때가 아니라 제공업체에 로그인할 때 MFA를 요구할 수 있습니다. 자세한건 Use Salesforce MFA for SSO를 참고하세요.
Configure Inbound SSO with a Third-Party Identity Provider
제3자 신원 제공업체를 통한 inbound SSO 설정:
The head of IT department, 션이 Salesforce사용자들에 SSO를 설정해달라고 요청했습니다. 기존에 Jedeye network credentials를 가지고 자동으로 Salesforce에 접근할수 있게 말입니다. 신원검증을 제공하는 업체는 Axiom Heroku web app입니다.
SSO를 설정하는 순서는 아래와 같습니다.
각 사용자의 Federation ID를 생성하고
Salesforce에서 SSO settings을 설정하고
SSO provider에 Salesorce settings을 설정하고
테스트해서 확인합니다.
Step 1: Create a Federation ID
SSO를 사용하려면 사용자의 고유한 아이디가 필요합니다. username이나 user ID를 써도 되는데 일반적으로 Federation ID를 사용합니다. 초반에는 Salesforce Data Loader를 이용해서 Federation ID를 한번에 할당하기도 합니다. Federation ID는 고유해야합니다. 그래서 username을 쓰는것이 좋지만 회사 조직이 여러개인경우 통합된 ID를 제공받아 Federation ID로 할당하기도 합니다.
신입 직원 Sia의 SSO를 설정해 보도록 하겠습니다.
Setup > Users > [Sia Thripio] > Edit > Single Sign On Information
Federation ID: sia@jedeye-tech.com *Federation ID는 기억해두세요. 나중에 신원업체에 SSO등록시 필요합니다.
Login버튼을 클릭하세요! 이메일 인증을 하고나면 로그인이 되어서 바로 Salesforce앱으로 이동합니다.
Troubleshooting
만약 로그인에 실패하고 아래와 같은 에러메세지가 난다면 SSO가 뭔가 하나라도 안맞아서 Salesforce가 SAML응답을 거부하는 거에요. 대부분 값 1-2개가 미세하게 틀린 경우가 원인입니다. (특히 Entity ID / Recipient(Login URL) / Federation ID 3종 세트)
Single Sing-On Error:
We can't log you in because of an issue with single sign-on. Contact your Salesforce admin for help.
Setup에서 아래의 3개 화면을 열어놓고 다시 데이타를 비교해주세요.
Setup > Users > [Sia Thripio]
Federation ID: sia@jedeye-tech.com
Setup > My Domain
Current My Domain URL: creative-koala-3yh67n-dev-ed.trailblaze.my.salesforce.com
Setup > Single Sign-On Settings > [Axiom Test App]
우선 로그인 페이지가 정확한지 확인하세요. Setup > My Domain > Current My Domain URL앞에 https://를 붙인것이 Setup > Single Sign-On Settings > [Axiom Test App] > Entity ID와 동일한지 확인하세요.
신원업체
Salesforce
Username or Federated ID
Setup > Users > [Sia Thripio] > Federation ID
Recipient URL
Setup > Single Sign-On Settings > [Axiom Test App] > Login URL
Entity Id
Setup > Single Sign-On Settings > Axiom Test App > Entity ID
Hands-on Challenge
Your Challenge
Set Up Single Sign-On in Your Org
Make it easy for users to log in to your Trailhead Playground or Developer Edition org by setting up single sign-on (SSO). In this challenge we check only that you’ve set up SSO, not the specific configuration, but we’ve provided the specifics below to make it easier.
If you followed along with the steps in this unit and already implemented SSO in your org, make sure that org is selected below and then go ahead and click Check Challenge.
Note: You created a new Trailhead Playground to complete the hands-on challenge in the first unit of this module. You can use that same playground to complete this challenge.
Set up SSO:
Create a Federation Id
User: Choose your own user
Federation Id: user@example.com (we won’t check this, so you can also use any valid ID)
Download the certificate
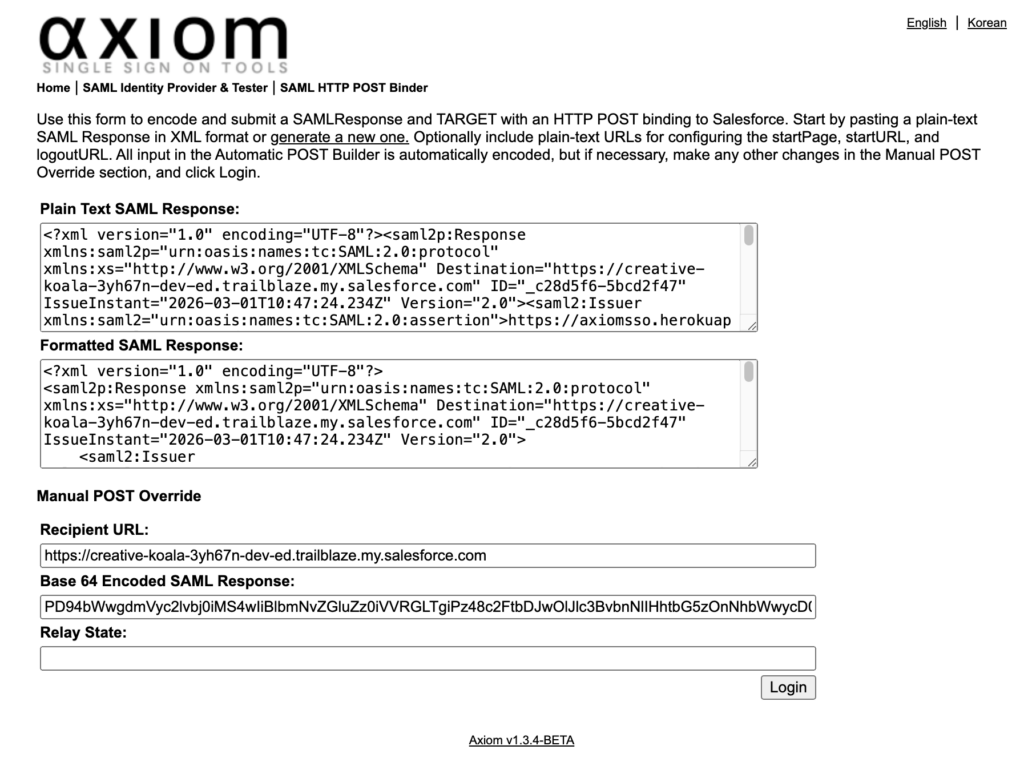
In a new tab, navigate to https://axiomsso.herokuapp.com
Click SAML Identity Provider & Tester, then click Download the Identity Provider Certificate
Enable SAML if it’s not already enabled and create a new single sign-on setting
Name: Axiom Test App
Issuer: https://axiomsso.herokuapp.com
Identity Provider Certificate: The file you just downloaded
Request Signature Method: RSA-SHA1
SAML Identity Type: Assertion contains the Federation Id from the User object
SAML Identity Location: Identity is in the NameIdentifier element of the Subject statement
Service Provider Initiated Request Binding: HTTP Redirect
Entity Id: Enter your My Domain name, including “https”
Link your identity provider to Salesforce
In a new tab, navigate to https://axiomsso.herokuapp.com, click SAML Identity Provider & Tester, and click generate a SAML response
SAML version: 2.0
Username or Federated ID: user@example.com
Issuer: https://axiomsso.herokuapp.com
Recipient URL: Get the URL from the Salesforce SAML Single Sign-On Settings page. Don’t see it? It’s at the bottom of the page (in the Endpoints section) labeled Login URL. It’s also shown in the image in Step 3, item 4.
Entity Id: The entity ID from the Salesforce SAML Single Sign-On Settings page.
로그인 URL에 도메인을 넣거나 로그인 화면에 회사 로고를 넣는 등의 맞춤서비스를 My Domain을 통해서 할수 있습니다
What Is My Domain?
도메인을 등록해서 관리하고, 서브도메인을 통해서 조직화하면 동일한 브라우저에서 서로 다른 조직에 로그인하여 작업이 가능합니다. 단일 로그인(SSO)을 설정하여 한번의 로그인으로 여러 서비스를 이용할 수도 있고, 소셜계정으로 로그인하는 것도 가능하게 되며, 로그인페이지를 꾸밀수도 있습니다.
My Domain은 모든 서비스에 할당되며, 초기값은 Salesforce에서 부여한 도메인이 됩니다. My Domain설정에서 회사도메인으로 변경하는 방법을 설명합니다.
Set My Domain Policies
지난 시간에 MFA를 OFF하지 않으셨다면 Playground에 접속이 안되실거에요. 새로운 Playground를 생성해서 실습을 따라해주세요.
사용자가 Salesforce로그인 할때 어디로 보내고, 어떤 로그인 방식으로 쓰게 할지 설정하려면:
Setup > My Domain > Routing and Policies > Edit
Salesforce Edge Network
Routing Method
☑️ Global 전 세계 Salesforce Edge Location 중 사용자에게 가장 빠른 경로로 라우팅
🔲 Use Salesforce locations in US only 미국 내 서버로만 라우팅
Login Policy
🔲 Prevent login from https://login.salesforce.com and https://welcome.salesforce.com 반드시 My Domain으로만 로그인. 일반 로그인 페이지 차단. SSO 쓸 때 필수. SSO는 My Domain 통해야 작동하기 때문. ✅ SSO를 사용중인데 직원이 login.salesforce.com에 접근해서 비밀번호 로그인을 해서 SSO를 우회하는것을 방지하기 위해 체크, MFA 정책통합 가능
❌ login.salesforce.com
⭕ yourdomain.my.salesforce.com
🔲 Prevent SOAP API login from https://login.salesforce.co API를 통한 로그인 차단. 이것도 My Domain통해서만 접속하게 강제함.
Cookies
🔲 Require first-party use of Salesforce cookies 타사 컨텍스트에서 쿠키 사용 차단. 브라우저 보안 강화. 요즘 Chrome 정책 때문에 점점 중요해짐.
My Domain을 활성화하면 로그인 주소가 바뀌는데 사용자들은 예전 북마크를 계속 쓰기 때문에 자동으로 보내주는 것임. Redirections은 기존 URL로 들어온 사용자를 My Domain URL로 자동 보내는 기능. 즉 옛날 주소로 들어와도, 새 도메인으로 자동 이동.
Setup > My Domain > Redirections > Edit
🔲 Log redirections 자동으로 보내준 기록을 남겨서 My Domain전환 후 문제를 추적하거나 어떤 사용자가 아직 옛날 URL을 쓰는지, Integration이 잘못된 URL이 있는지 등을 확인합니다.
🔲 Use the native browser for user authentication on iOS iOS에서 사용자 인증에는 기본 브라우저를 사용
🔲 Allow sharing native browser session for user authentication on iOS iOS에서 사용자 인증을 위해 네이티브 브라우저 세션 공유를 허용
🔲 Use the native browser for user authentication on Android Android에서 사용자 인증에는 기본 브라우저를 사용
🔲 Allow sharing native browser session for user authentication on Android Android에서 사용자 인증을 위해 네이티브 브라우저 세션 공유를 허용 위의 옵션들은은 모바일 기기에서 Salesforce 및 Mobile SDK 애플리케이션 사용자를 위한 위임 인증부터 인증서 기반 인증에 이르기까지 다양한 인증 방식을 지원합니다. 이러한 옵션은 로그인 페이지 브랜딩에 영향을 미치지 않으므로 변경하지 않습니다.
Save!
Profile > Log Out
Quiz +100
You need a My Domain in place to do which of the following? A. Authenticate users. B. Work in multiple Salesforce orgs in the same browser. C. Set up single sign-on (SSO) with third-party identity vendors. D. A and B E. B and C
What section on the My Domain page in Setup contains options for branding your login page? A. Redirections B. Authentication Configuration C. Routing and Policies D. My Domain Details
Set up multi-factor authentication for your users.
Use the Salesforce Authenticator app for MFA logins.
Get login information about users who log in to your org.
MFA(Multi-Factor Authentication)
아이디랑 비번으로는 완벽한 보안을 보장할 수 없기때문에 2중 보안장치를 하는데요. Salesforce에서는 모든 사용자에게 MFA가 필수조건입니다. To learn about the MFA requirement, check out the Salesforce Multi-Factor Authentication FAQ.
본 강좌에서는 핸폰이 필요합니다.
What Is Multi-Factor Authentication?
2-factor authentication는 들어보셨죠? 같은 맥락인데 2개 이상의 인증절차를 제공하기 때문에 2대신 multi를 붙인거에요.
그러면, 여기서 말하는 Multi-Factor에는 어떤게 있을까요:
Something you know:
아이디랑 비번
ATM기 쓸때 PIN
Something you have: 사용자가 소유하고 있는 verification methods
핸폰인증 authenticator app
집에 들어갈때 열쇠키
Requiring another factor in addition to a username and password adds an extra, important layer of security for your org. Even if a user’s password is stolen, the odds are very low that an attacker can guess or impersonate a factor that a user physically possesses.
How Multi-Factor Authentication Works
MFA는:
아이디와 비번을 우선적으로 물어봅니다
그다음에 하나 또는 여러단계의 인증절차를 요구하죠
아래는 Salesforce에서 사용가능한 인증절차입니다.
Salesforce Authenticator
A free mobile app that integrates seamlessly into your login process. Users can quickly verify their identity via push notifications. We talk more about this app in a bit.
Third-party TOTP authenticator apps
Apps that generate unique, temporary verification codes that users type in when prompted. This code is sometimes called a time-based one-time password, or TOTP for short. Users can pick from a wide variety of options, including Google Authenticator, Microsoft Authenticator, or Authy.
Security keys
Small physical tokens that look like a thumb drive. Logging in with this option is fast and easy; users simply connect the key to their computer then press the key’s button to verify their identity. Users can use any key that’s compatible with the FIDO Universal Second Factor (U2F) or FIDO2 WebAuthn standards, such as Yubico’s YubiKey or Google’s Titan Security Key.
Built-in authenticators
Biometric readers, such as fingerprint or facial recognition scanners, that are built into a user’s device. In some cases, built-in authenticators can leverage a PIN or password that users set up on their device’s operating system. Common examples include Touch ID, Face ID, and Windows Hello.
When Are Users Prompted for Multi-Factor Authentication?
사용자들은 매번 로그인 할때마다 multiple factors인증단계를 거쳐야합니다. Salesforce의 약관에 의거, Salesforce UI에 접속하는 모든 사용자들은 반드시 MFA를 사용해야합니다.
Jedeye Technologies의 Salesforce Production을 런칭하기 전에 직원들이 손쉽게 로그인을 하게 MFA를 비활성화 시켰습니다. 이제 전 직원의 MFA를 활성화 시키고, 새로운 직원 Sia Thripio를 사용자로 추가하고 MFA도 활성화 해주세요.
Check ✅ Generate new password and notify user immediately
Save
이메일확인 후 비번변경해주세요.
Check your email inbox
Click the Link and Reset Password
New Password: *********
이제 Sia로 로그인을 해볼텐데요. Log Out을 하고 Sia로 다시 로그인을 해도 이미 다른 탭에서 System Admin으로 로그인이 되어 있으면 계속 System Admin으로 로그인이 됩니다. Sia로 로그인을 하시려면 다른 브라우저나, 크롬의 다른 계정으로 열어서 Sia로 로그인을 해주세요.
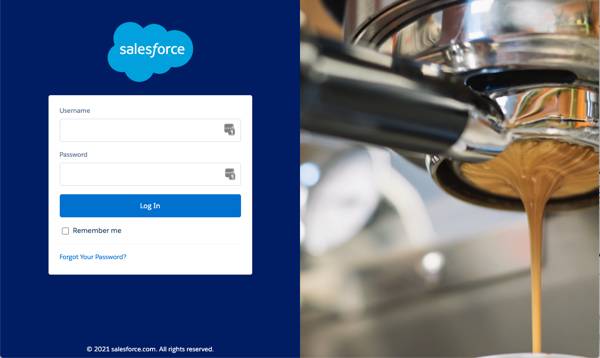
Login as Sia
Username: sthripio.112233@trailhead.com
Password: *********
Register Your Mobile Phone
Country/Territory: United States (+1)
Mobile Phone Number: 551-335-****
Register!
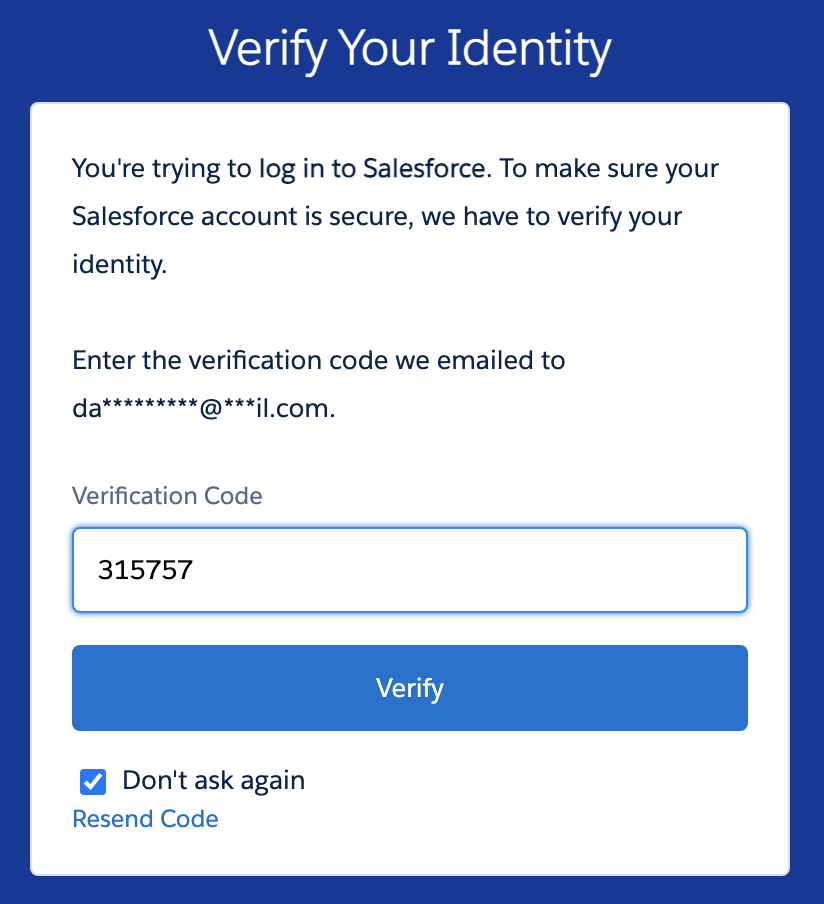
Enter Verification code
Verification Code: ######
Verify!
Turn on MFA for Everyone in Your Org
모든 사용자들이 MFA을 사용하도록 활성화하기
Setup > Identity Verification
Check ✅ Require multi-factor authentication (MFA) for all direct UI logins to your Salesforce org
Save!
이제 모든 직원들이 MFA를 무조건 사용하도록 설정이 되었습니다. 물론 새로운 직원 Sia도 MFA를 사용해야합니다. 하지만 때에 따라서 MFA를 사용하지 않도록 유지해야하는 계정이 있을수 있습니다. 테스트계정등이 그렇죠. 사용자별로 MFA설정을 다르게 주고 싶다면 다음 문서를 참고하세요. Exclude Exempt Users from MFA
How Users Register Salesforce Authenticator for MFA Logins
다른 나라에서 잠시 온 직원들이 전번이 없거나 하면 폰에 Salesforce Authenticator를 설치하면 MFA인증을 받을 수 있습니다. Salesforce Authenticator를 설치하는데는 핸드폰과 더불어 데스크탑도 함께 필요합니다.
아래는 Salesforce Authenticator에 사용자 계정을 추가하는 방법입니다.
📱Salesforce Authenticator를 폰에 설치한뒤 앱을 여세요.
📱각종안내는 Skip하고,
📱Is this your first time connecting an account to Salesforce Authenticator?
Yes!
📱You can approve requests and user 6-digit time-based one-time passwords(TOTPs) only after you connect an account to Salesforce Authenticator
Connect Your Account!
📱Connect Your Account
On your computer, enter this two-word phrase when prompted
honest quality
💻 Login as Sia
Choose Another Verification Method!
✅ Use the Salesforce Authenticator mobile App
Continue!
Connect Salesforce Authenticator
Two-Word Phrase
honest quality
Connect!
📱Connect Account
Username: sthripio.112233@trailhead.com
Service: Salesforce
Connect!
📱Account Added
Got It!
📱Enable Permissions
Notifications Disables버튼을 눌러서 Enable시켜줍니다. 그래야 Desktop에서 로그인을 할때 Authenticator에서 인증 팝업이 뜹니다. 나중에 해야지 하고 iPhone에서 Disable시키면 나중에 설정에서 Notification옵션이 안나타나요.
📱Salesforce Authenticator 위의 화면이 보이면 정상적으로 설치가 된것입니다.
Sia의 계정이 Salesforce Authenticator에 추가되었습니다.
💻 이제 사용자가 어디선가 로그인을 시도한다고 칩시다.
💻 그러면 인증앱을 열어서 인증하라고 합니다.
📱폰을 열어보면 누가 어디서 로그인을 시도하려고 하는지 아래와 같이 보여줍니다. Approve버튼을 눌러서 인증합니다.
Back Up Connected Accounts
Salesforce Authenticator앱에서 백업설정을 해볼게요
왼쪽 상단 톱니아이콘 누르면 설정화면이 뜹니다.
Back Up Accounts가 현재 OFF로 되어 있을거에요. 그걸 ON으로 바꾸도록 클릭하세요.
그러면 인증화면이 뜨면서 이메일을 입력하라고 합니다.
이메일 입력하고 Send Code버튼 클릭
인증번호 입력 및 Verify버튼 클릭
백업을 복구할때 사용할 4자리 숫자 Passcode설정
Back Up Accounts가 ON으로 바뀝니다.
Verify That Salesforce Authenticator Can Send Notifications
처음에 설정할때 실수로 Notification을 받지 않도록 클릭했다면 설정에서 받도록 바꿀수 있습니다.
톱니바퀴 > Push Notification > Disabled > Change in Settings
어떤 iPhone에서는 처음에 한번 Notification을 거절하면 Settings에가서 해당 앱을 보면 Notification설정하는 부분 자체가 없을 수 있습니다. 그럴때는 해당 Account를 삭제하고 다시 추가하면 Notification옵션을 추가하도록 할수 있습니다.
Automate the Authentication Process
시간이 지나면 언젠가는 다시 로그인을 해야하는 일이 생기는데 그때마다 Salesforce Authenticator를 열고 인증버튼 누르고 하는거 너무 귀찮잖아요. 그래서 같은 장소, 같은 기기, 같은 브라우저나 앱에서 동일한 계정으로 로그인을 하는 경우에는 Salesforce가 자동으로 인증을 해줍니다.
💻 로그아웃하시고 다시 로그인하세요
📱 그러면 폰으로 인증팝업이 날라오죠. 그때 밑에 보면 Trust and automate request for 90 days라고 toggle상자가 있습니다. 그걸 켜놓으면 지금 보이는 정보로 들어오는 로그인에 대한 요청은 자동으로 인증이 됩니다.
자동로그인 인증기능을 사용하시려면 반드시 App이 Location정보를 항상 접근할 수 있어야하고 Background Refresh도 허용(ON)이 되어 있어야합니다.
자동인증은 여러군데 설정할 수도 있고, 전부다 지워버릴수도 있습니다.
해당 계정 우측에 more버튼(꺽쇠아이콘)을 누르면 그동안 로그인한 기록이 전부 보이고요
우측상단에 톱니바퀴 > Remove All Automation버튼을 클릭하면 모든 자동인증 설정이 삭제됩니다.
직원들이 사무실에서 로그인을 한다면 신뢰할만한 IP를 등록해서 인증절차 없이 간편하게 로그인하도록 설정할 수 있습니다.
Setup > Identity Verification
✅ Let Salesforce Authenticator automatically verify identities using geolocationSecurity and Privacy Warnings
🔲 Salesforce Authenticator uses the phone’s location services to verify the user’s identity. If users approve the location, they aren’t prompted for their identity when at that location. If the location is not approved, or if users are outside the trusted location, they’re prompted to verify their identity.Let Salesforce Authenticator automatically verify identities based on trusted IP addresses onlySecurity and Privacy Warnings
그러면 사용자는 Authenticator를 안깔았던 상태로 돌아가게 되어서 다시 설정을 할수 있게 됩니다.
Monitor Who’s Logging In to Your Org
직원들의 로그인 히스토리를 보겠습니다.
Setup > Identity Verification History
정보가 너무 많아서 보기가 힘들면 Create New View를 클릭해서 간단한 버젼을 만드셔도 됩니다.
Hands-on Challenge
Require a User To Log In Using Multi-Factor Authentication
Create a more secure environment by requiring multiple factors of authentication when users log in to your org. This challenge requires you to enable MFA for your Trailhead Playground.
Create a new Trailhead Playground to complete this challenge by clicking the Trailhead Playground name below and selecting Create Playground. It typically takes 3–4 minutes for Salesforce to create your Trailhead Playground.
Note: Yes, we really mean a brand-new Trailhead Playground! If you use an existing org or playground, you can run into problems completing this challenge.
Enable this org setting in Identity Verification setup:
Multi-Factor Authentication (MFA)
Require multi-factor authentication (MFA) for all direct UI logins to your Salesforce org
Log in to your org as the user to register for multi-factor authentication
Log out, then log in again with multi-factor authentication
풀이
Setup > Identity Verification
Multi-Factor Authentication (MFA)
Check ✅ Require multi-factor authentication (MFA) for all direct UI logins to your Salesforce org
Save!
아마 위에 설정만 확인을 할겁니다. 강의를 잘 따라오셨다면 이미 도전과제는 완료하신거에요.
설정 원상복귀 해주세요
향후 단원에서 연습을 계속하기 위해서는 MFA를 비활성화 시키셔야합니다.
Setup > Identity Verification
Multi-Factor Authentication (MFA)
Uncheck 🔲 Require multi-factor authentication (MFA) for all direct UI logins to your Salesforce org
회사가 커지면 다루는 화폐도 여러개일 수 있습니다. 단일화폐를 사용하던 작은 회사가 글로벌 대기업에 합병되어서 여러개의 화폐를 사용해야하는 상황이 왔을때 아래와 같이 다중화폐를 활성화합니다.
Setup > Company Information > Edit
Check ✅ Activate Multiple Currencies
Save
다중화폐를 활성화 하면:
다른 화폐를 추가할 수 있게 되고, 새로운 회사전체의 화폐를 선택할 수도 있습니다.
회사 전체화폐는 헤드쿼터를 따라가지만 직원개개인의 화폐는 또 다를 수 있다는 점 명심하세요.
직원을 설정할때 해당 직원이 사용하게될 화폐를 선택하는것 잊지 마세요
Activate Currencies
다중화폐를 활성화시키면 이제 사용할 화폐를 추가할 수 있습니다.
Setup > Company Information > Currency Setup > New
Currency Type: KRW – Korean Won
Conversion Rate: 1.5
Decimal Places: 0
Save
Deactivate KRW > OK
해당 Currency를 Deactivating을 해도 기존에 해당 Currency를 이용하던 항목은 계속 유지가 됩니다. 하지만 비활성화된 순간부터 해당 Currency로는 입력하지 못하게 됩니다. 만약 비활성화한 그 화폐가 사용자의 화폐로 따로 저장되어 있었다면 해당 사용자의 화폐는 회사의 기본화폐로 자동 변경됩니다.
Set Your Corporate Currency
회사의 기본 화폐를 변경하면 바로 사용할 수 있습니다.
Setup > Company Information > Currency Setup > Change Corporate
New Corporate Currency: KRW – Korean Won
Save
Update Conversion Rates
각 화폐에 대한 환율을 저장하겠습니다.
Setup > Company Information > Currency Setup > Edit Rates
Save
Implement Advanced Currency Management
환율을 바꾸면 기존에 과거 데이타도 전부 현재환율로 다시 계산되는 참사가 일어납니다. 이 사태를 방지하기 위해서 반드시 Advanced Currency Management를 사용하셔야해요. 환율을 정할때는 기간을 정해서 언제부터 언제까지 이 환율을 적용한다라고 명시하셔야합니다.
Setup > Company Information > Currency Setup
Advanced Currency Management is not enabled > Enable버튼
✅ Yes, I want to enable Advanced Currency Management
Enable
When advanced currency management is first enabled, your existing exchange rates automatically become the first set of dated exchange rates. These rates are valid for all time, until you define another set of exchange rates.
When advanced currency management is enabled, Visualforce <apex:inputField> and <apex:outputField> components cannot display currency fields.
Add Personal Currencies
사용자에 따라서 Default Currency를 따로 설정할 수 있습니다. 다만 회사가 활성화한 화폐중에서만 선택할 수 있어요.
[사용자앱] > Profile > Settings > Language & Time Zone
Currency: USD – U.S. Dollar
Cancel
Quiz +100
What must you do before adding new currencies to your company settings? A. Set the corporate currency B. Activate the multicurrency option for your org C. Add the Currency dropdown field to the Opportunities object D. Purchase multicurrency licenses for all platform users
Enabling Advanced Currency Management enables your org to do what? A. Choose more than one currency for a single account B. Add currencies to personal profiles C. Manage dated exchange rates D. Have all currency conversions use the static exchange rates
Company Setting은 보통 Salesforce를 시작할때 한번 세팅을 하는데요. 회사체계가 크게 변했다거나 글로벌기업으로 발돋움했다거나 하는 일이 없는한 마치 신분증처러 변경할 일이 없습니다. Mom & Pop’s Spy Shop을 예로 들어서 설명드릴게요.
Company Settings를 구분하자면 아래와 같습니다.
Details
For Example
Company Information
Name and Address
Used for billing and support
Mom & Pop’s Spy Shop7 Wink Nudge DriveFrisco, CA 94101
Primary Contact
Also for billing and support
John Doe
Default Locale
Updating this one setting determines the way a ton of information is displayed within Salesforce (More on this later)
English (United States)
Default Currency
Currency applied to records
English (United States) USD
Currencies
List of all currencies used in the org
USD only
Storage Used
Those cat pics pile up fast!
27.3 GB (11%)
Licenses Available
Includes Salesforce and feature licenses
Salesforce Platform: 14 of 15 used
Fiscal Year
Fiscal Year
Used in reporting and forecasting
Standard, starting January
Support Information
Business Hours
These are used when escalation rules do their escalating
Mon to Fri, 8AM to 8PM
Holidays
Days that cases skip escalation
June 27 (International Day of Mystery)
OK, But What Are Locale Settings?
Displaying information to your users in a familiar way improves users’ Salesforce experience and makes them more efficient secret agents. The Salesforce locale settings determine the display formats for date and time, user names, addresses, and commas and periods in numbers. As the admin, you set the default locale, but your users can set a personal locale if they’re based in a different location.
사는 지역에따라 날짜나 시간이 다를 수 있고, 이름의 형식이나, 주소형식, 또는 숫자를 사용할때 어디에 콤마를 찍는지가 다를 수 있는데요 Locale세팅을 함으로인해 이를 정의합니다. Locale세팅은 조직전체에 적용하는 세팅을 기본값으로 할수 있고, 사용자에 따라서 다르게 세팅할 수도 있습니다.
Mom & Pop’s Spy Shop이 영국의 대기업 Nacho Secrets Agency에 합병되었다고 가정해보자구요. 그러면 헤드쿼터가 바뀌었으니 회사주소랑 Financial System도 새로운 회사기준에 맞춰 갱신을 해야겠죠.
작업을 진행하기에 앞서 새로운 Playgroud를 생성해주세요. 주소와 지역정보에 대한 설정을 변경해 볼게요.
Setup > Company Information > Edit
Address:
Street: 007 Cipher Cl
City: London
Zip/Postal Code: EC2N 2DB
Country: United Kingdom
Locale Settings:
Default locale: English (United Kingdom)
Default Time Zone: (GMT +00:00) Greenwich Mean Time (Europe/London)
Save
회사마다 회계년도가 다릅니다. 다른 회사에 합병이 되었으니 그 회사의 회계연도에 맞춰야겠죠?
Setup > Fiscal Year
Fiscal Year Start Month: July
Save
OK
Update Your Personal Locale
회사 전체의 기준 지역은 바꼈어도 직원은 여전히 미국사무실에 있다면 해당 직원의 지역은 회사전체설정과를 달라야합니다. 예를 들어 포르투칼말을 하는 사람이 미국 오리건주에 사는데 고객은 브라질에서 일한다면 해당 직원에게 개인설정을 변경하라고 알려줘야하는데 그건 Admin이 해줄수는 없고 어떻게 하라고 다음과 같이 알려줄수 있습니다.
App Launcher > [해당직원의 앱, 예를 들어 Sales] > Profile(우측상단 직원얼굴) > Settings
Quick Find > Language & Time Zone
Time Zone: (GMT-08:00) Pacific Standard Time (America/Los_Angeles)
Locale: English (United States)
Launguage: Português (Brasil)
Save
Hands-on Challenge
Update your company address, fiscal year, and time zones
Congratulations, your budding spy organization was recently acquired. Update your address to the new fancy office space. Change the fiscal year to reflect your parent organization’s financial system. Update your locale and the company locale to the correct time zones.
Street: 123 Secret Street
City: Baltimore
State/Province: Maryland
Zip/Postal Code: 21201
Default Time Zone to (GMT-07:00) Mountain Standard Time (America/Phoenix)
Set your company’s Fiscal Year Start Month to February
Set your personal Time Zone to (GMT-04:00) Venezuela Time (America/Caracas)
풀이
회사의 헤드쿼터의 위치가 바꼈다면 Admin이 Setup에서 갱신해야할 일이고, 개인적으로 하나의 직원인 내가 일하는 사무실이 옮겨졌다면 Settings에서 직원이 직접 사무실의 위치를 갱신해야합니다. 문제에서 회사의 위치와 타임존을 변경하라고 나왔으니 주어준 주소는 회사설정에서 Admin이 변경해야하는 정보입니다.
Setup > Company Information > Edit
Street: 123 Secret Street
City: Baltimore
State/Province: Maryland
Zip/Postal Code: 21201
Country: US
Default Locale: English (United States)
Default Time Zone: (GMT-07:00) Mountain Standard Time (America/Phoenix)
Save
Setup > Fiscal Year
Fiscal Year Start Month: February
Fiscal Year is Based On: ✅ The starting Month
Save > OK
[직원의 앱] > Settings > Advanced User Details
Time Zone: (GMT-04:00) Venezuela Time (America/Caracas)
Chatter그룹은 Public과 Private으로 나뉘는데 Public은 누구나 포스트를 쓰고, 읽고 할수 있는 반면 Private Chatter는 정해진 사용자만 포스트를 읽고 쓰고 할 수 있습니다.
Create Chatter Groups for All Sales and All Support
All Sales Chatter group생성
App Launcher > Salesforce Chatter > Groups > New
Name: All Sales
Description: Collaboration space for all things related to Sales
Access Type: Public
Save & Next
Next
Done
방금 만든 All Sales Chatter group에 인사글 포스팅을 해볼게요
Share an update…:
Welcome to the All Sales group, which replaces the All Sales email list.
Share
이번에는 All Support Chatter group 생성
App Launcher > Salesforce Chatter > Groups > New
Name: All Support
Description: Collaboration space for all things related to Support
Access Type: Private
Save & Next
Next
Done
All Support Chatter group에 인사글 업로드
Share an update…:
Welcome to the All Support group, which replaces the All Support email list.
Share
Link를 All Support group에 Post하고 @mentions을 어떻게 사용하는지 설명
Post message:
Hi Support people! Here is some quick training on how to use the @mention feature, to bring another user or even an entire group into a Chatter conversation.


 아이콘 클릭하면 우측에 사이드바가 나타납니다.
 > Select Fields to Display