Study for the Administrator Certification Exam > Configuration and Setup (15%) > User Authentication > Set Up Single Sign-On for Your Internal Users
Learning Objectives
After completing this module, you’ll be able to:
- Create a Federation(연합) ID.
- Set up single sign-on(SSO) from a third-party identity provider.
- Become familiar with the tools to troubleshoot SAML requests.
Single Sign-On
SSO를 통하면 로그인을 하지 않고도 로그인을 할수 있고 아래의 이점들이 있습니다:
- 비번관리를 하지 않아도 되고
- 수동으로 로그인 하지 않아도 되고, 5-20초안에 로그인이 된다.
- 원클릭으로 문서를 열수 있는 링크를 제공합니다.
- 민감한 정보들은 한곳에서 관리할 수 있습니다.
만약 회사앱들이 물리적으로 같은 서버에 존재한다면 inbound SSO으로 다른 앱에서 로그인을 하면 Salesforce에도 로그인 없이 로그인을 자동으로 할수 있고, 마찬가지로 Salesforce에 로그인이 되어 있다면 outbound SSO를 통해 다른 회사앱에도 자동으로 로그인이 되게 할수 있습니다.
Keep MFA in Mind
SSO 제공업체에서 MFA 서비스를 제공하는 경우 사용자가 Salesforce에 액세스할 때가 아니라 제공업체에 로그인할 때 MFA를 요구할 수 있습니다. 자세한건 Use Salesforce MFA for SSO를 참고하세요.
Configure Inbound SSO with a Third-Party Identity Provider
제3자 신원 제공업체를 통한 inbound SSO 설정:
The head of IT department, 션이 Salesforce사용자들에 SSO를 설정해달라고 요청했습니다. 기존에 Jedeye network credentials를 가지고 자동으로 Salesforce에 접근할수 있게 말입니다. 신원검증을 제공하는 업체는 Axiom Heroku web app입니다.
SSO를 설정하는 순서는 아래와 같습니다.
- 각 사용자의 Federation ID를 생성하고
- Salesforce에서 SSO settings을 설정하고
- SSO provider에 Salesorce settings을 설정하고
- 테스트해서 확인합니다.
Step 1: Create a Federation ID
SSO를 사용하려면 사용자의 고유한 아이디가 필요합니다. username이나 user ID를 써도 되는데 일반적으로 Federation ID를 사용합니다. 초반에는 Salesforce Data Loader를 이용해서 Federation ID를 한번에 할당하기도 합니다. Federation ID는 고유해야합니다. 그래서 username을 쓰는것이 좋지만 회사 조직이 여러개인경우 통합된 ID를 제공받아 Federation ID로 할당하기도 합니다.
신입 직원 Sia의 SSO를 설정해 보도록 하겠습니다.
- Setup > Users > [Sia Thripio] > Edit > Single Sign On Information
- Federation ID: sia@jedeye-tech.com
*Federation ID는 기억해두세요. 나중에 신원업체에 SSO등록시 필요합니다.
- Federation ID: sia@jedeye-tech.com
- Save!
Step 2: Set Up Your SSO Provider in Salesforce
Salesforce에 SSO를 제공하는 신원업체에 대해서 알려주도록 설정합니다.
신원업체에서 Certificate다운로드:
- 새로운 브라우저에 https://axiomsso.herokuapp.com를 엽니다.
- SAML Identity Provider & Tester!
- Download the Identity Provider Certificate!
Salesforce에서 로그인 도메인 복사:
- Setup > My Domain
- Current My Domain URL: creative-koala-3yh67n-dev-ed.trailblaze.my.salesforce.com
* URL기억해두세요. SSO설정에 사용됩니다.
- Current My Domain URL: creative-koala-3yh67n-dev-ed.trailblaze.my.salesforce.com
Salesforce에서 SSO설정:
- Setup > Single Sign-On Settings > Edit
- SAML Enabled ✅
- Save!
- SAML SSO Settings > New
- Name: Axiom Test App
- Issuer: https://axiomsso.herokuapp.com
- Identity Provider Certificate: [아까 다운받은 파일 여기다 업로드하세요]
- Request Signature Method: RSA-SHA1
- SAML Identity Type: ✅ Assertion contains the Federation ID from the User object
- SAML Identity Location: ✅ Identity is in the NameIdentifier element of the Subject statement
- Service Provider Initiated Request Binding: ✅ HTTP Redirect
- Entity ID: https://creative-koala-3yh67n-dev-ed.trailblaze.my.salesforce.com
*복사해온 My도메인 URL에 https://추가하는거 잊지마세요
* 이URL은 Login URL이 되고, 뒤에서 신원업체에 SSO등록시 필요합니다.
- Save!
SSO설정페이지에서 Login URL복사:
- Endpoints >
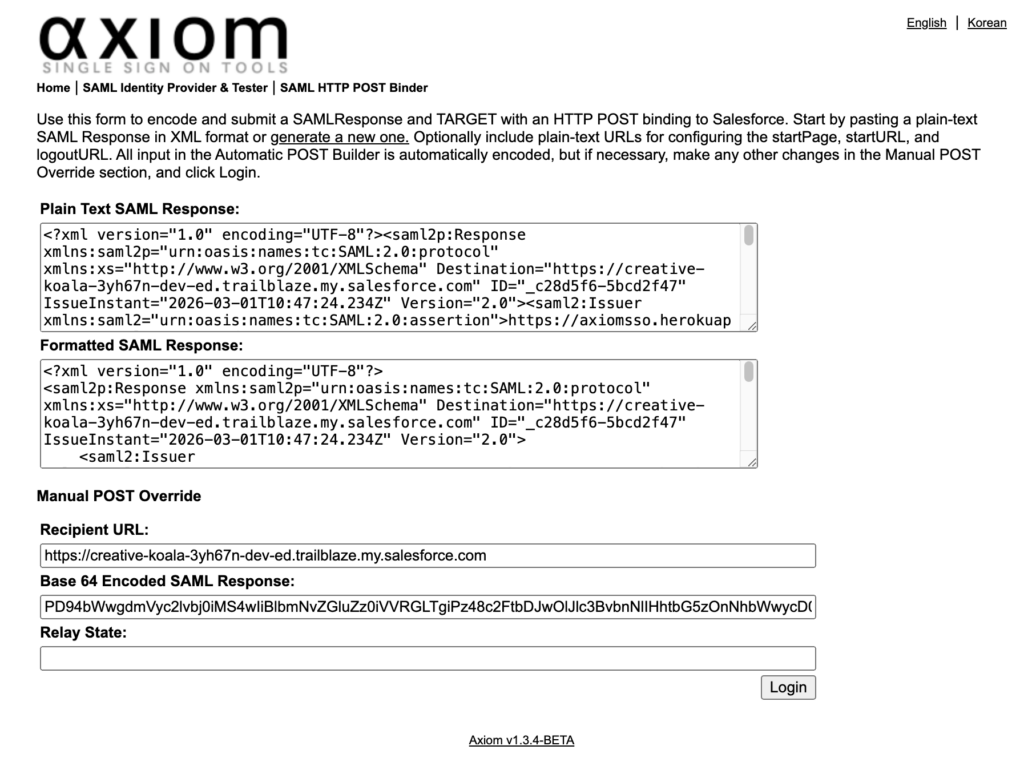
Step 3: Link Your Identity Provider to Salesforce
이제 신원업체에 Salesforce가 SSO를 사용하겠다고 알려줍니다.
신원업체에서:
- https://axiomsso.herokuapp.com를 엽니다.
- SAML Identity Provider & Tester
- generate a SAML response
- SAML Version: 2.0
- Username or Federated ID: sia@jedeye-tech.com
* 위에서 기억해놨던 Sia의 Federated ID - User ID Location: ✅ Subject
- Issuer: https://axiomsso.herokuapp.com
- Recipient URL: https://creative-koala-3yh67n-dev-ed.trailblaze.my.salesforce.com
- Entity Id: https://creative-koala-3yh67n-dev-ed.trailblaze.my.salesforce.com
- SSO Start Page: http://axiomsso.herokuapp.com/RequestSamlResponse.action
- User Type: ✅ Standard
- Request SAML Response!
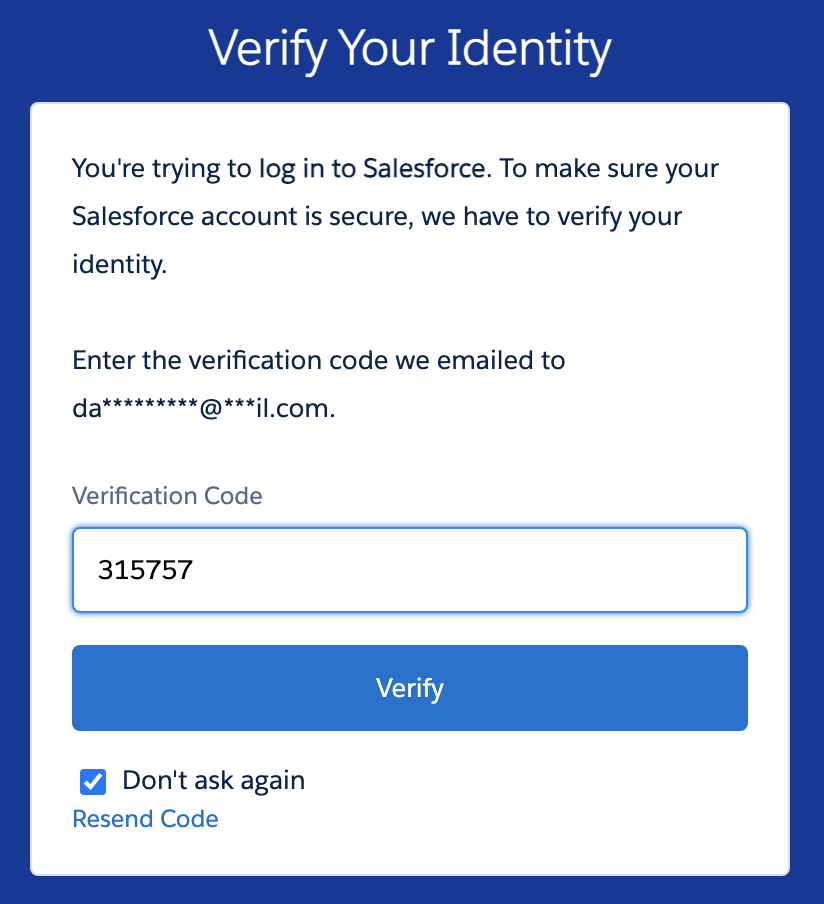
Step 4: Make Sure It All Works
위에서 Request SAML Response를 클릭하면 아래와 같은 화면이 뜰거에요.
Login버튼을 클릭하세요! 이메일 인증을 하고나면 로그인이 되어서 바로 Salesforce앱으로 이동합니다.
Troubleshooting
만약 로그인에 실패하고 아래와 같은 에러메세지가 난다면 SSO가 뭔가 하나라도 안맞아서 Salesforce가 SAML응답을 거부하는 거에요. 대부분 값 1-2개가 미세하게 틀린 경우가 원인입니다. (특히 Entity ID / Recipient(Login URL) / Federation ID 3종 세트)
Single Sing-On Error:
We can't log you in because of an issue with single sign-on. Contact your Salesforce admin for help.
Setup에서 아래의 3개 화면을 열어놓고 다시 데이타를 비교해주세요.
- Setup > Users > [Sia Thripio]
- Federation ID: sia@jedeye-tech.com
- Setup > My Domain
- Current My Domain URL: creative-koala-3yh67n-dev-ed.trailblaze.my.salesforce.com
- Setup > Single Sign-On Settings > [Axiom Test App]
- Entity ID: https://creative-koala-3yh67n-dev-ed.trailblaze.my.salesforce.com
- Login URL: https://creative-koala-3yh67n-dev-ed.trailblaze.my.salesforce.com
우선 로그인 페이지가 정확한지 확인하세요. Setup > My Domain > Current My Domain URL앞에 https://를 붙인것이 Setup > Single Sign-On Settings > [Axiom Test App] > Entity ID와 동일한지 확인하세요.
| 신원업체 | Salesforce |
|---|---|
| Username or Federated ID | Setup > Users > [Sia Thripio] > Federation ID |
| Recipient URL | Setup > Single Sign-On Settings > [Axiom Test App] > Login URL |
| Entity Id | Setup > Single Sign-On Settings > Axiom Test App > Entity ID |
Hands-on Challenge
Your Challenge
Set Up Single Sign-On in Your Org
Make it easy for users to log in to your Trailhead Playground or Developer Edition org by setting up single sign-on (SSO). In this challenge we check only that you’ve set up SSO, not the specific configuration, but we’ve provided the specifics below to make it easier.
If you followed along with the steps in this unit and already implemented SSO in your org, make sure that org is selected below and then go ahead and click Check Challenge.
Note: You created a new Trailhead Playground to complete the hands-on challenge in the first unit of this module. You can use that same playground to complete this challenge.
- Set up SSO:
- Create a Federation Id
- User: Choose your own user
- Federation Id: user@example.com (we won’t check this, so you can also use any valid ID)
- Download the certificate
- In a new tab, navigate to https://axiomsso.herokuapp.com
- Click SAML Identity Provider & Tester, then click Download the Identity Provider Certificate
- Enable SAML if it’s not already enabled and create a new single sign-on setting
- Name: Axiom Test App
- Issuer: https://axiomsso.herokuapp.com
- Identity Provider Certificate: The file you just downloaded
- Request Signature Method: RSA-SHA1
- SAML Identity Type: Assertion contains the Federation Id from the User object
- SAML Identity Location: Identity is in the NameIdentifier element of the Subject statement
- Service Provider Initiated Request Binding: HTTP Redirect
- Entity Id: Enter your My Domain name, including “https”
- Link your identity provider to Salesforce
- In a new tab, navigate to https://axiomsso.herokuapp.com, click SAML Identity Provider & Tester, and click generate a SAML response
- SAML version: 2.0
- Username or Federated ID: user@example.com
- Issuer: https://axiomsso.herokuapp.com
- Recipient URL: Get the URL from the Salesforce SAML Single Sign-On Settings page. Don’t see it? It’s at the bottom of the page (in the Endpoints section) labeled Login URL. It’s also shown in the image in Step 3, item 4.
- Entity Id: The entity ID from the Salesforce SAML Single Sign-On Settings page.
- In a new tab, navigate to https://axiomsso.herokuapp.com, click SAML Identity Provider & Tester, and click generate a SAML response
- Test your work by logging in to your org again
- Create a Federation Id
풀이
오늘 강좌를 에러없이 따라오셨다면 그냥 Check Challenge버튼 누르셔서 +500 받아가시면 됩니다.